The idea
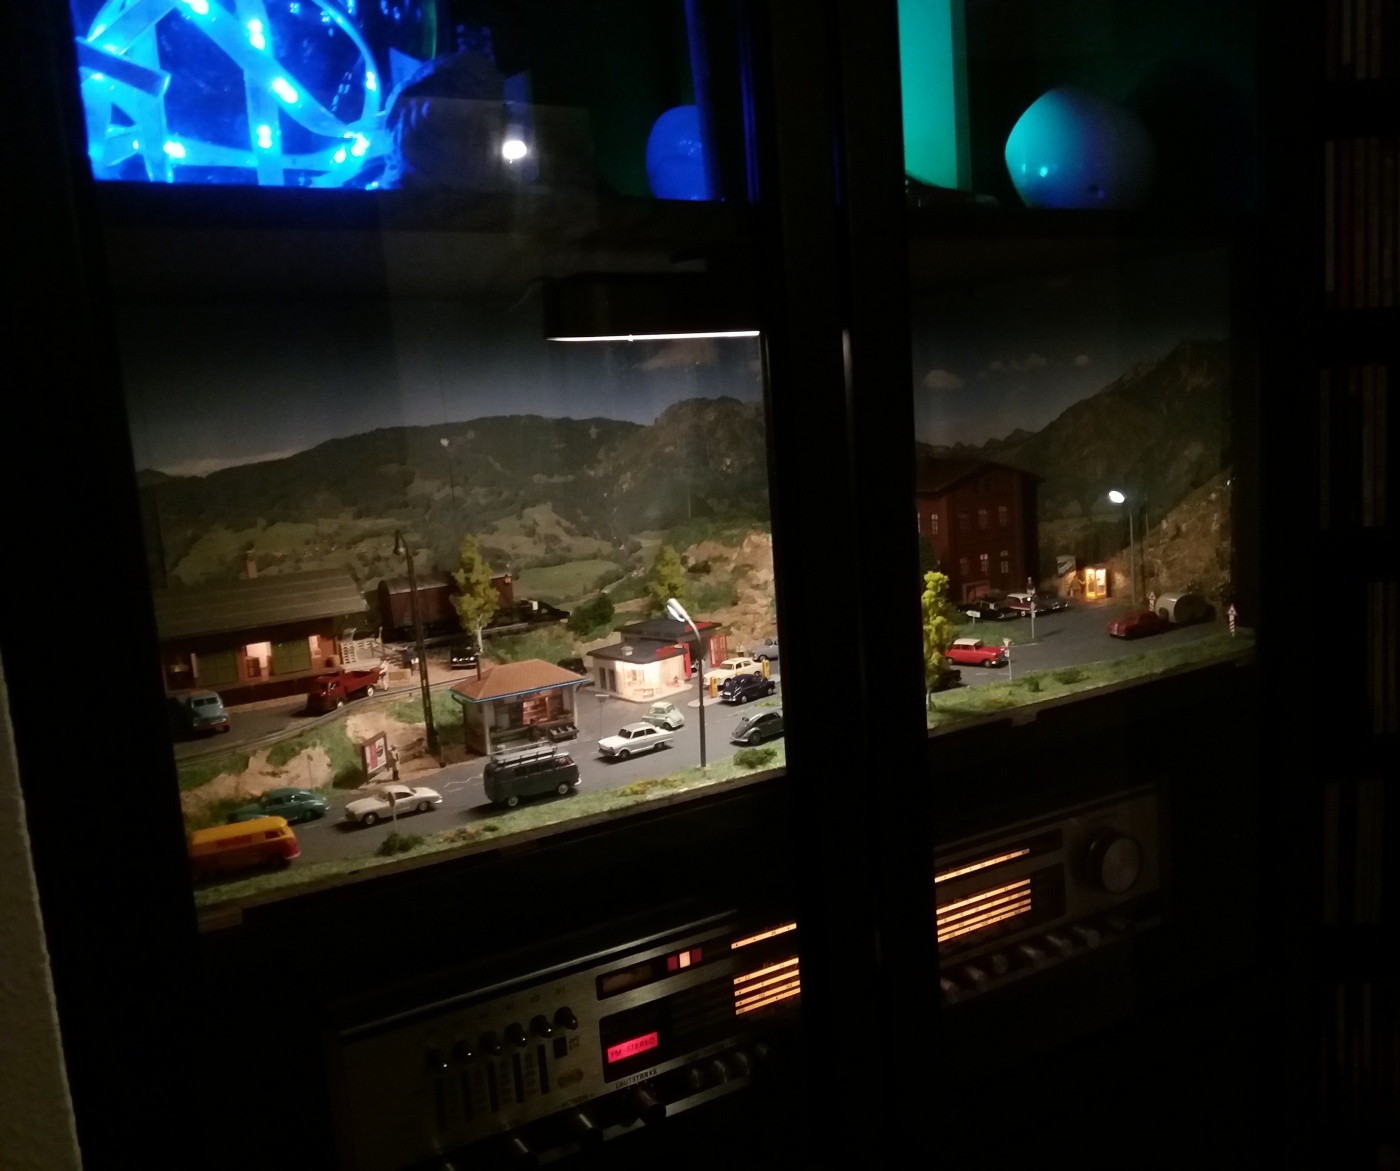
Out of an old love for model railways and lack of space and money for a large-scale layout, I decided to create a small but well designed and decorated diorama in H0 scale 1:87. In order to place this “showpiece” clearly visible, but protected from dust and damage, the installation on one level of the IKEA Kallax tall cabinet in my hallway behind glass doors was the obvious choice.
The area
The dimensions were clearly specified by the cabinet selected for the accommodation. Given the small dimensions, a real rail traffic was of course not possible, but at least one or two sidetracks with a buffer stop should run behind the freight station. For a problem-free installation of the system in the closet, I let some “clearance” on the side and came up with a floor space of 75 x 36.5 cm. Pine plywood in 6 mm thickness seemed sufficient for enough stability.
The buildings
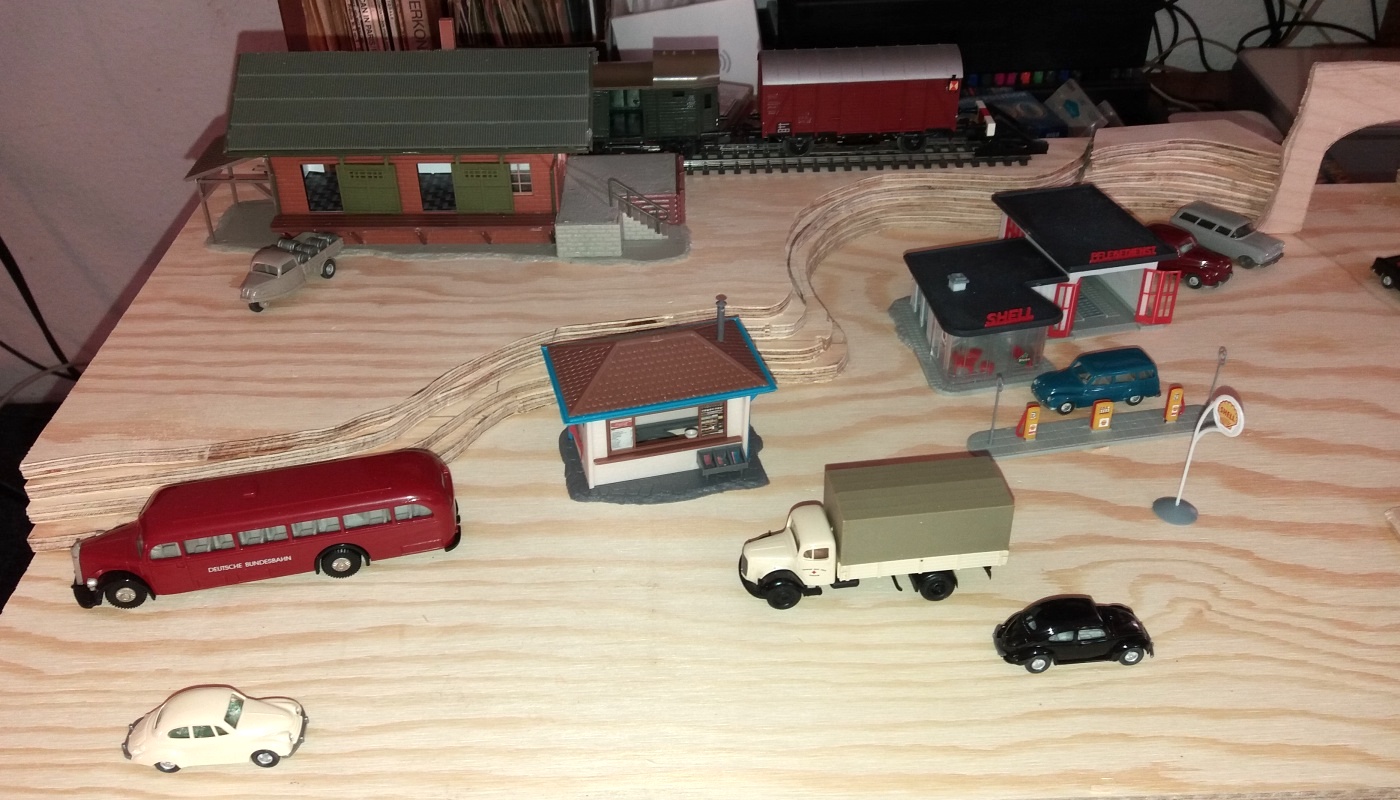
Due to the relatively small area, the possible number of buildings was severely limited. The intended epoch – around 1960 to 1975 – played a role in the selection. I decided on the following kits from Faller:
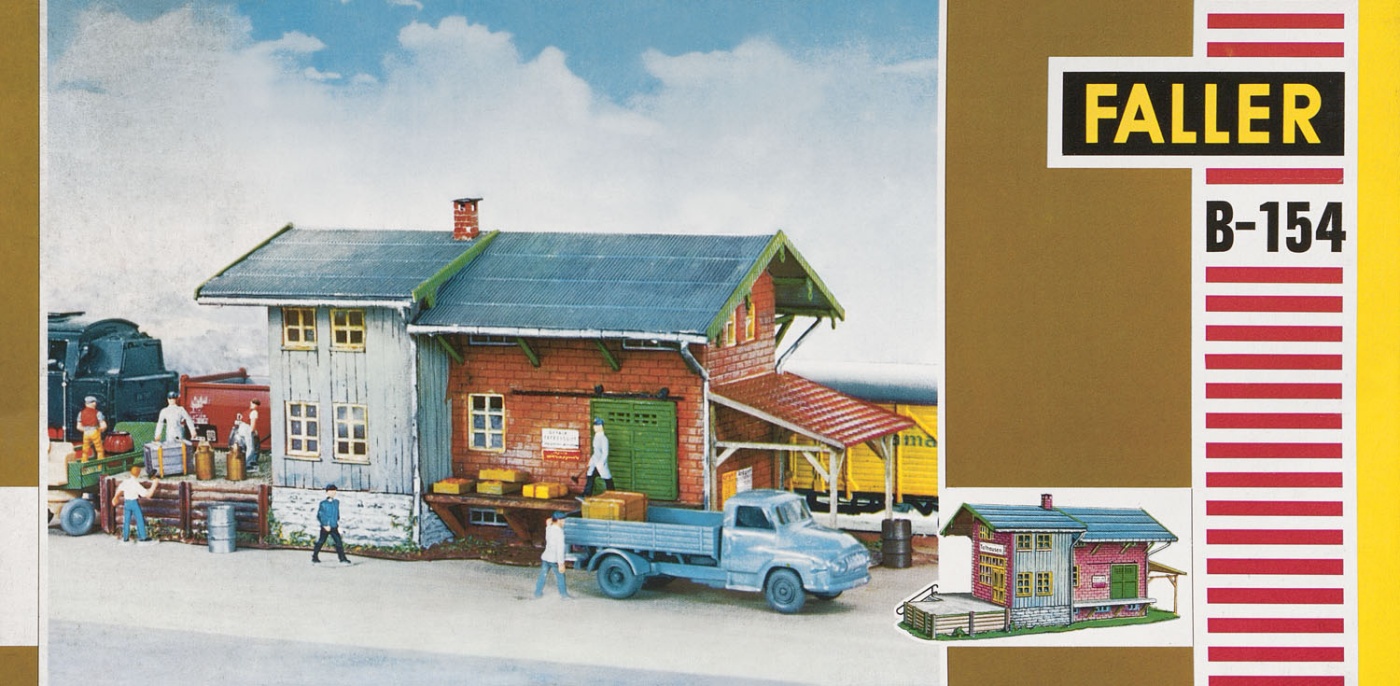
- “Freight depot” (Faller B-154) – real “railway romance” with loading ramps and roller doors. I already had this model on my old H0 layout in the 70s. It was available as a “classic” for a short time and is fortunately available under art. no. 120154 part of the regular Faller program again.
- “Shell gas station” (Faller B-217) – this model, which is typical for the 50s to 70s, was already on my Märklin layout around 50 years ago too and was also available for short time as a “classic”.
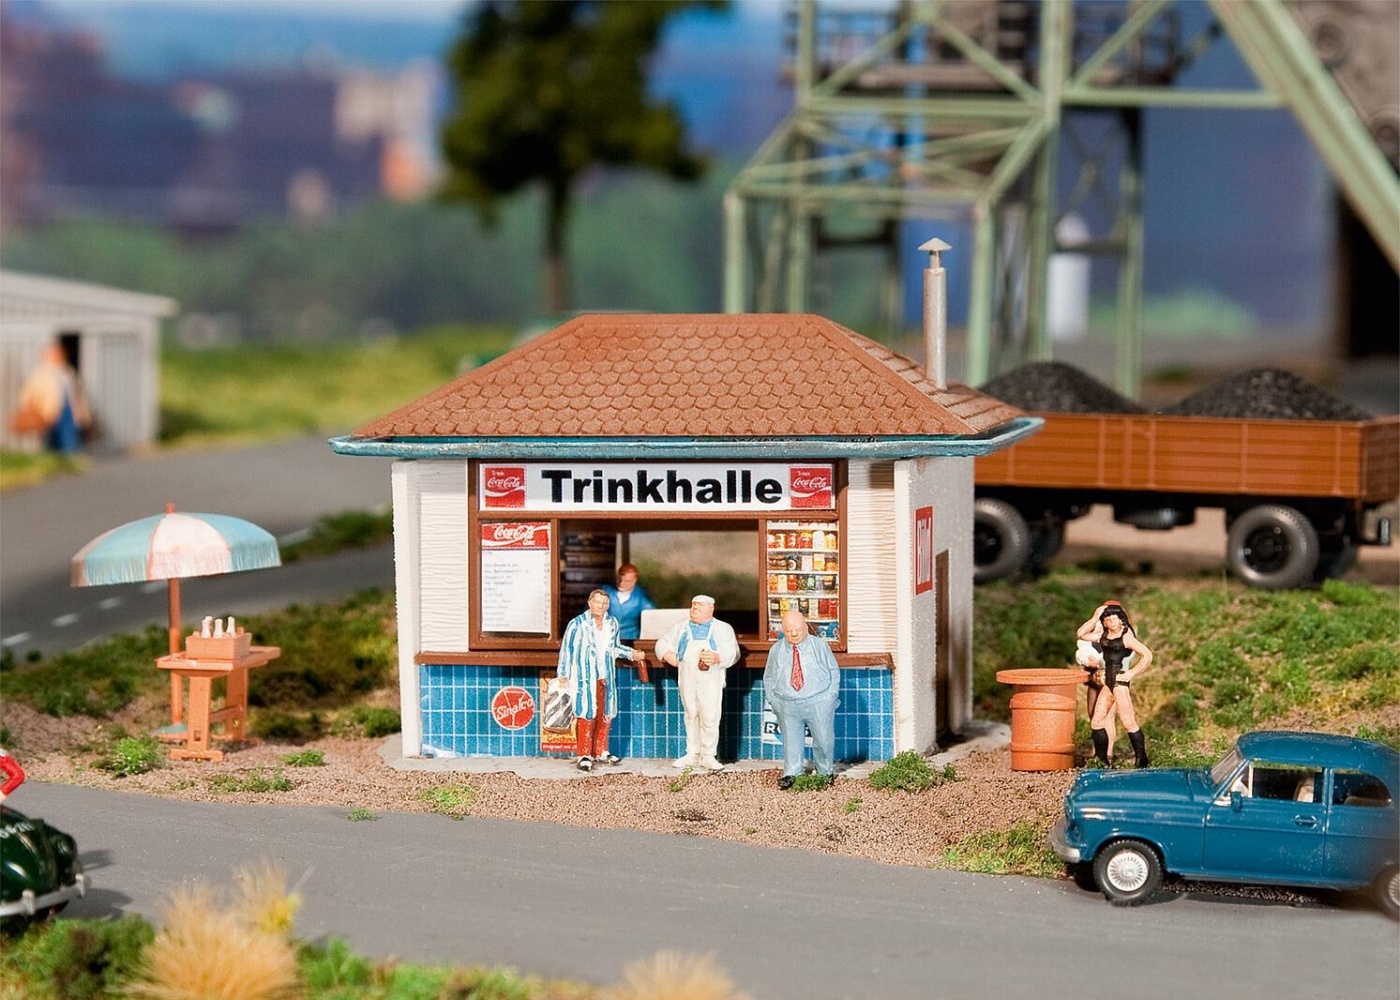
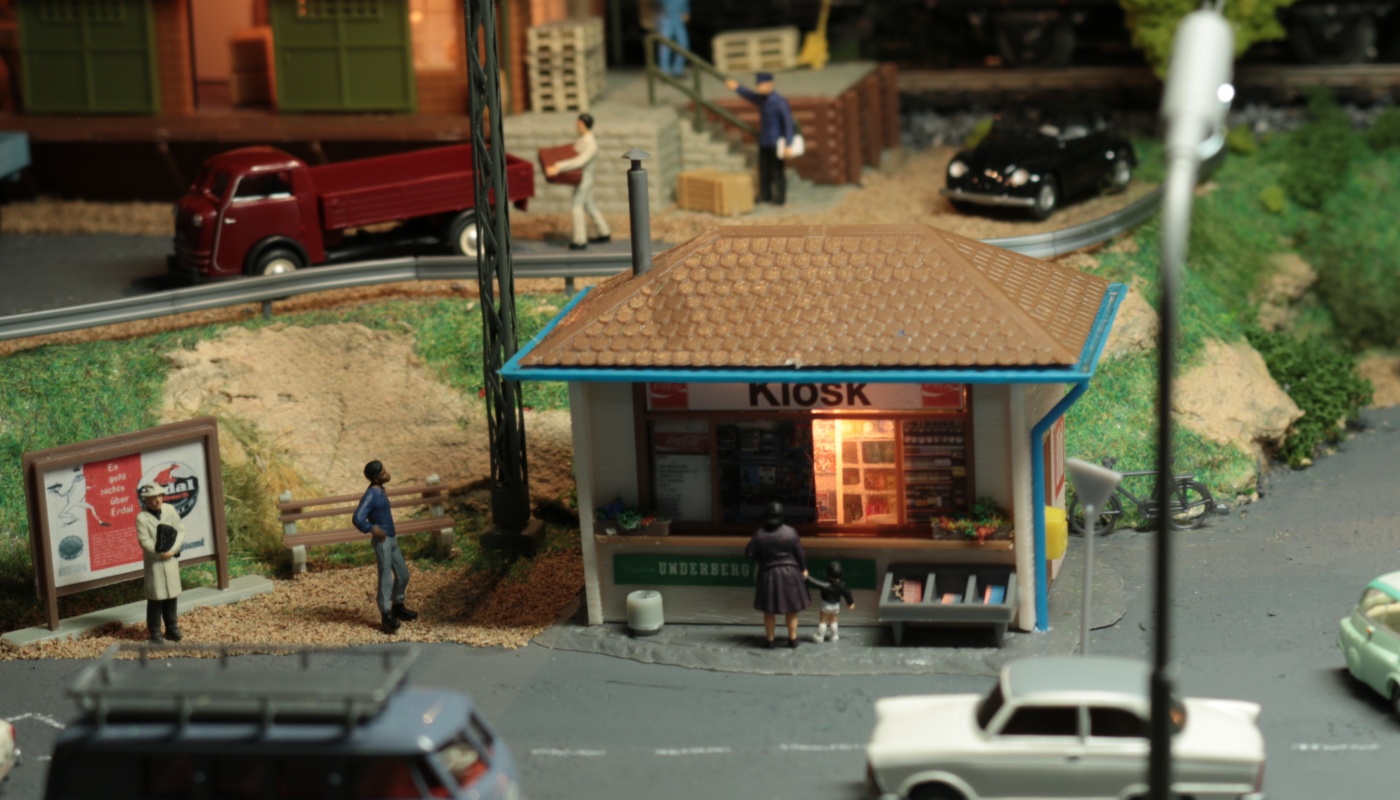
- “Drink stall” (Faller 130462) – always a “lively” location and used more as a kiosk in my case.
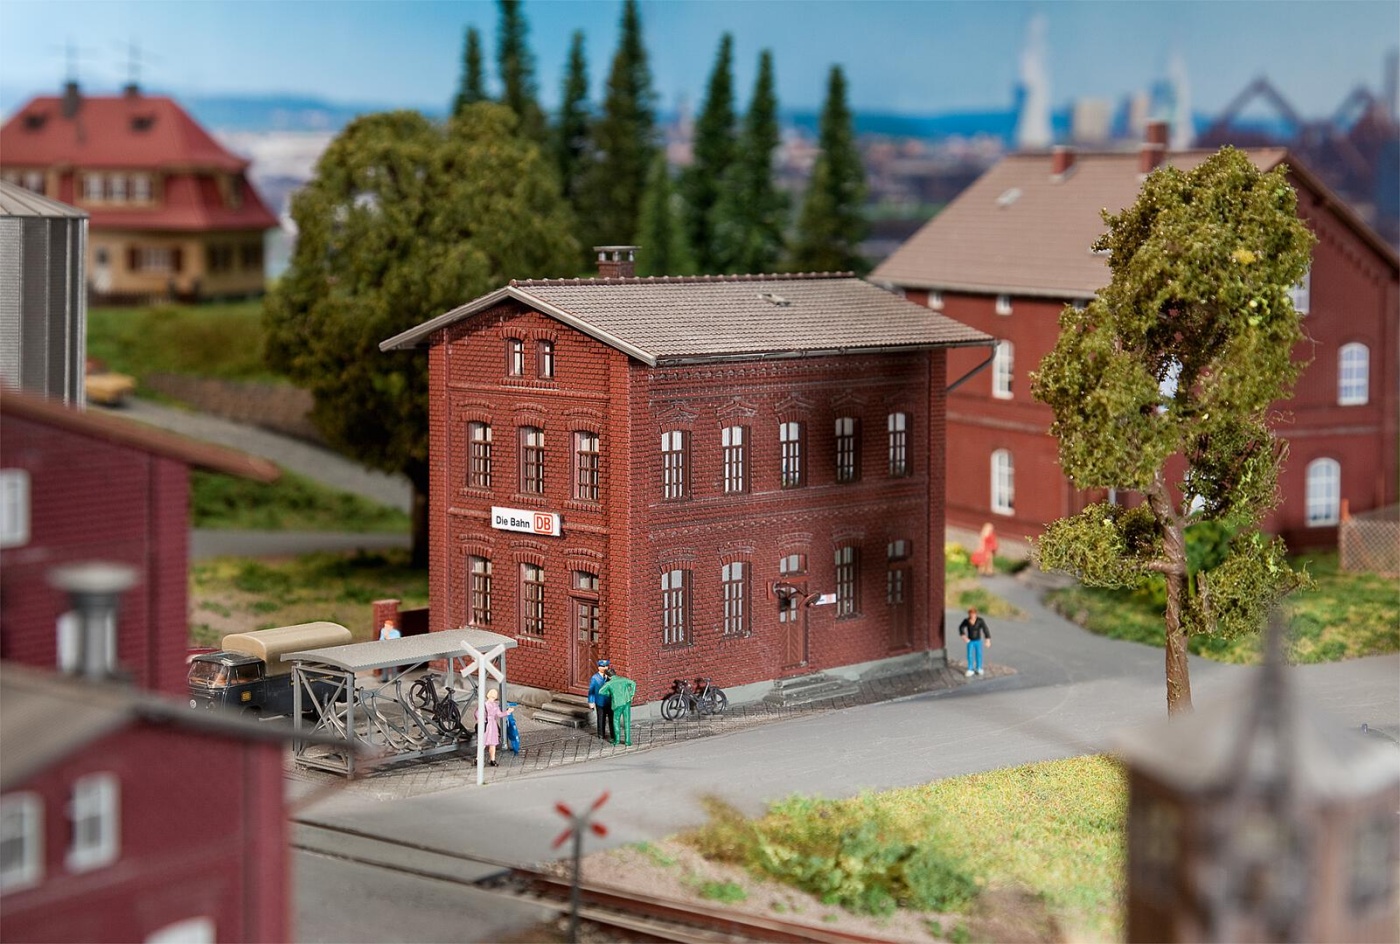
- “DB administration building” (Faller 120235) – a great, large clinker brick building with two and a half floors, “standard patina”, parking spaces and lovely details. Without DB signs it is very versatile – with me you could rather assume that it is … uh … some kind of “red light establishment” …
Interesting to see these buildings in a completely different setting:
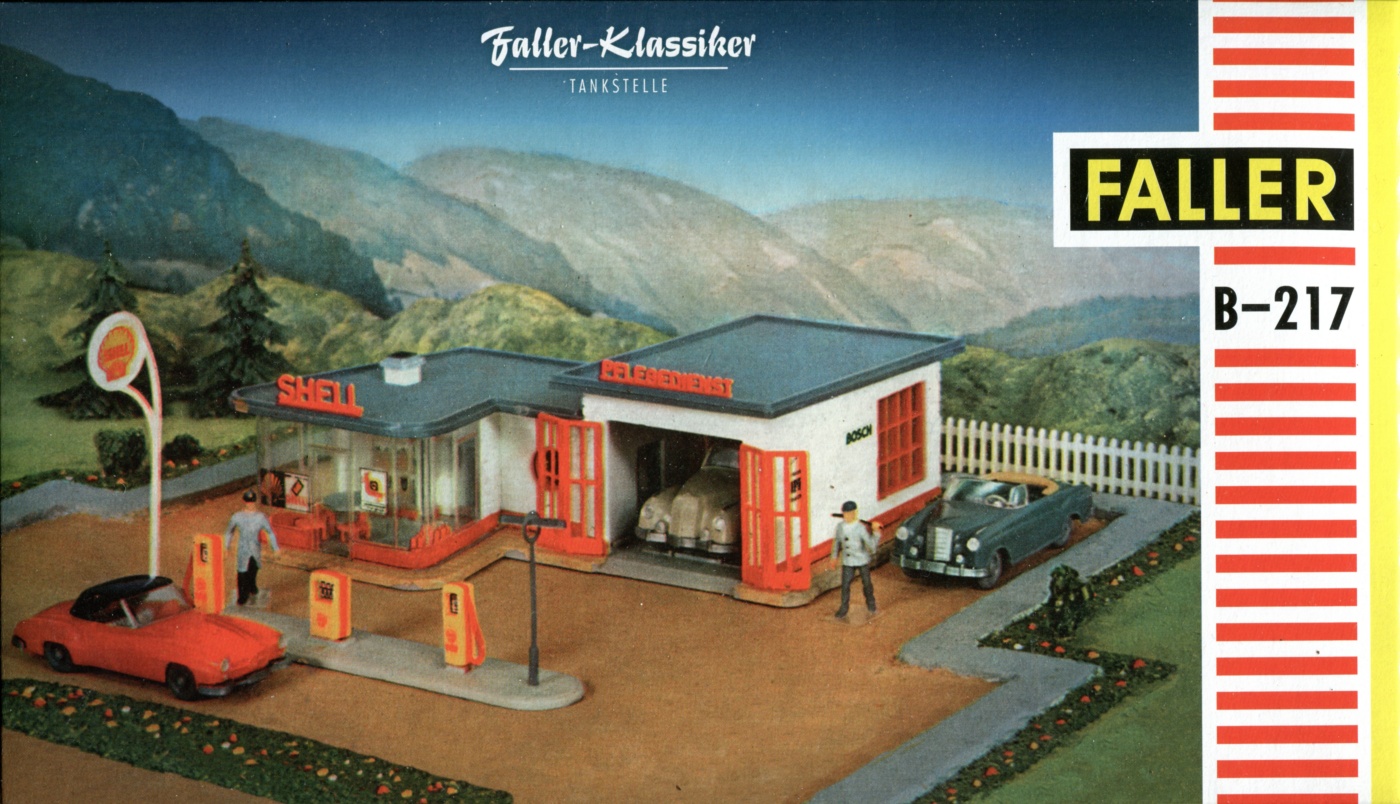

The “Faller classics” were offered with the beautiful old pack motifs, one of the kits also included a DIN A 5 reprint of issue 8 of December 1958 of the legendary “Faller Magazin” – no question about, a nice way to represent a “heritage” appropriately, wich is so rich in tradition!
The Plan
If the result is to be good, it is best to first make a good plan! – I did that with the good old Quark Xpress V 5, which I got for free at some point on the “add-on CD” of a computer magazine. This is particularly suitable because you can work with an accuracy of a tenth of a millimeter. The Faller company kindly provides dimensional sketches of their building kits, for the cars I used dimensional drawings of some car models, buses for truck dimensions.
Here is the first plan in which I included two sidetracks at the freight depot:
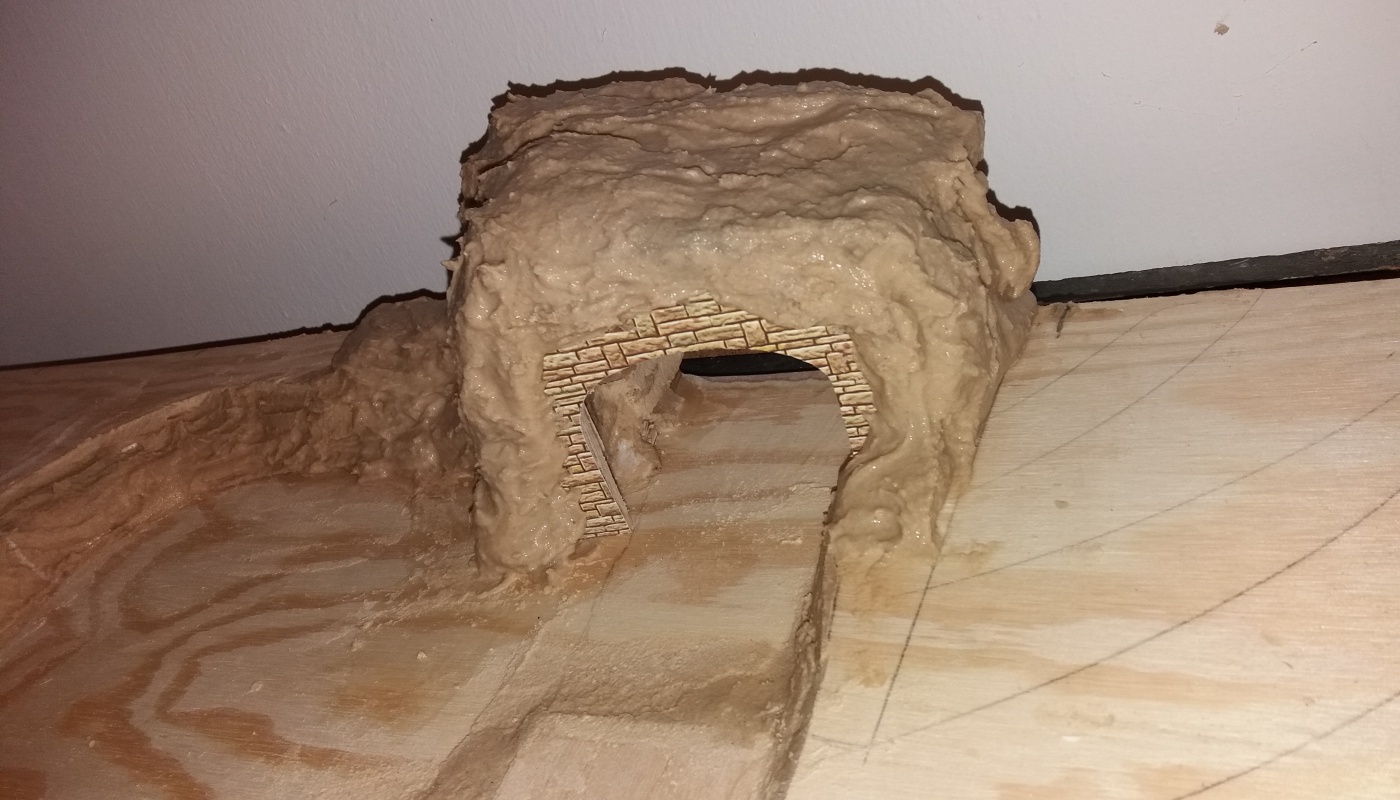
And here the last plan – I left out a sidetrack in order to gain significantly more space, after all, trucks should be able to maneuver somewhat in front of the freight depot! – For a “more exciting” landscape, I also planned a road junction with a kinking right of way and a tunnel entrance:
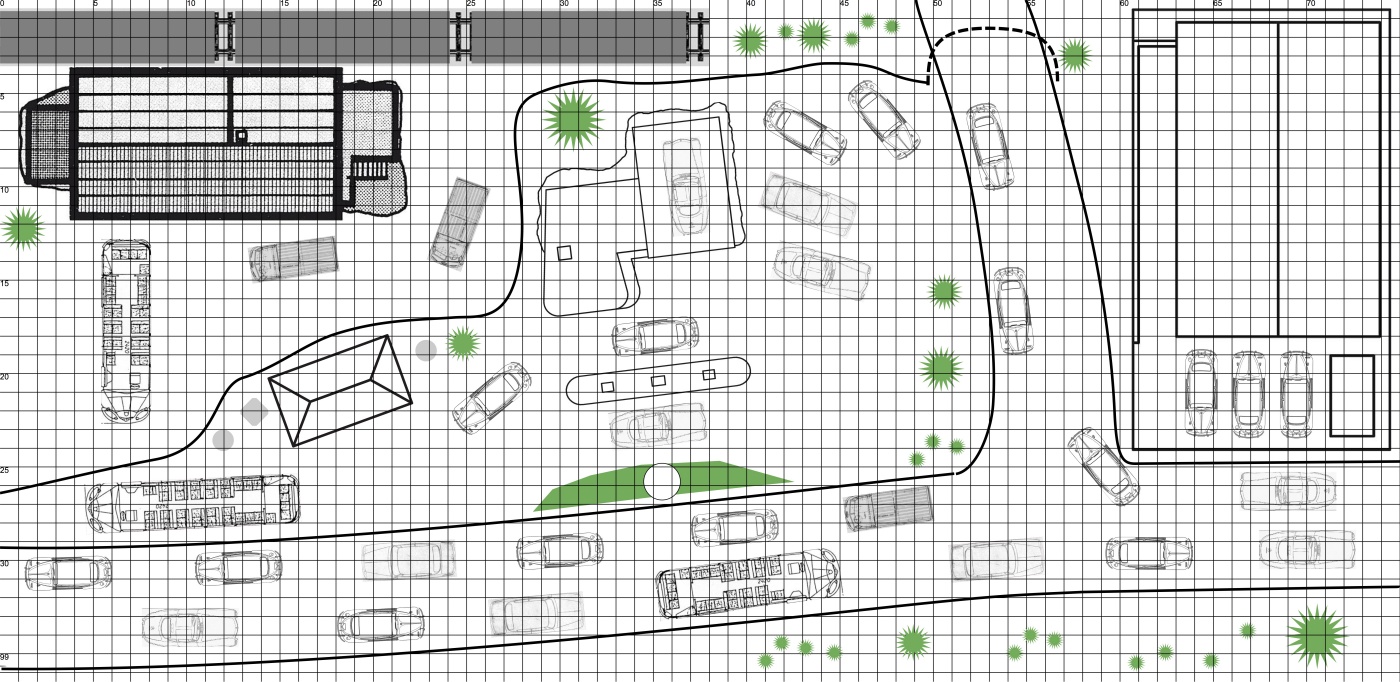
Over the plan I put a grid at centimeter intervals, which made the work enormously easier when marking the streets, sawing out the plywood layers for the height design, etc.
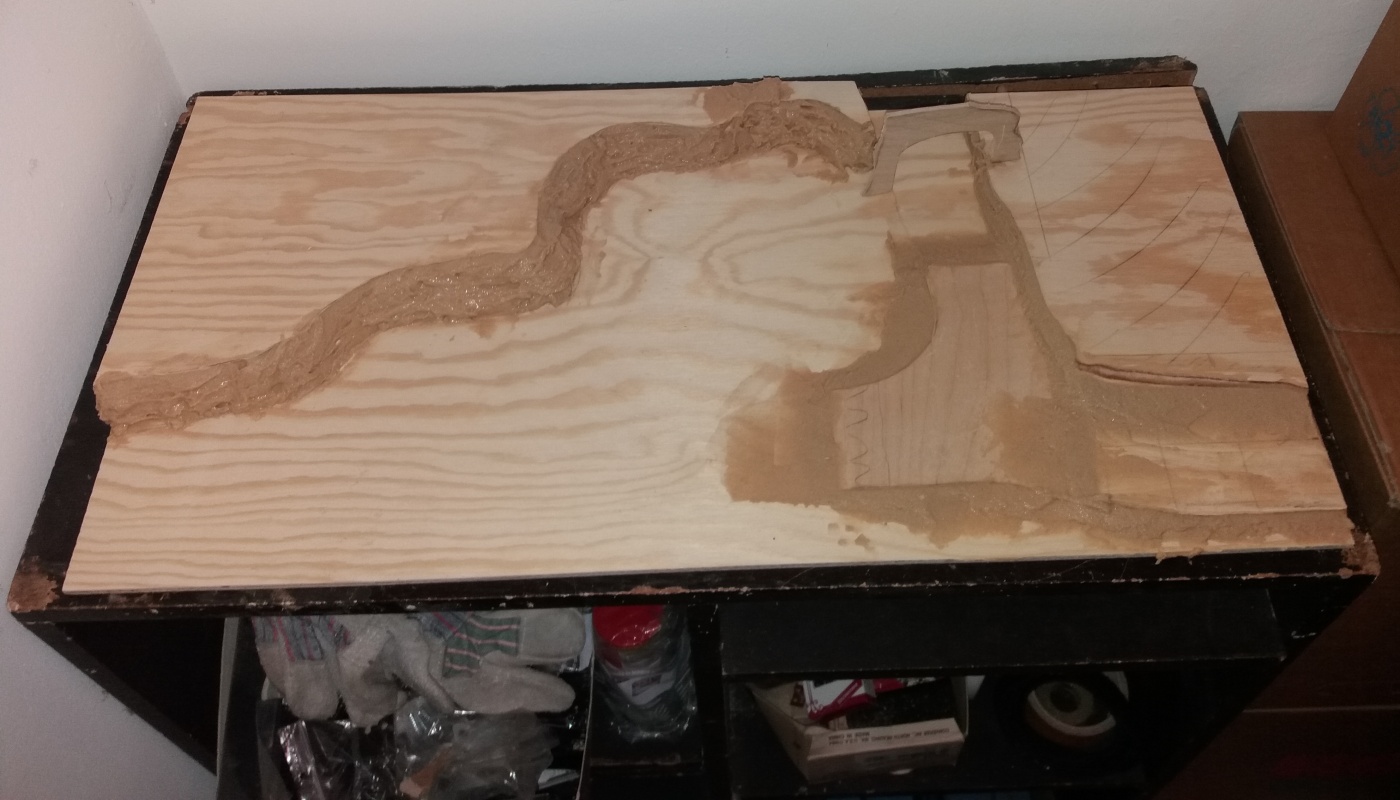
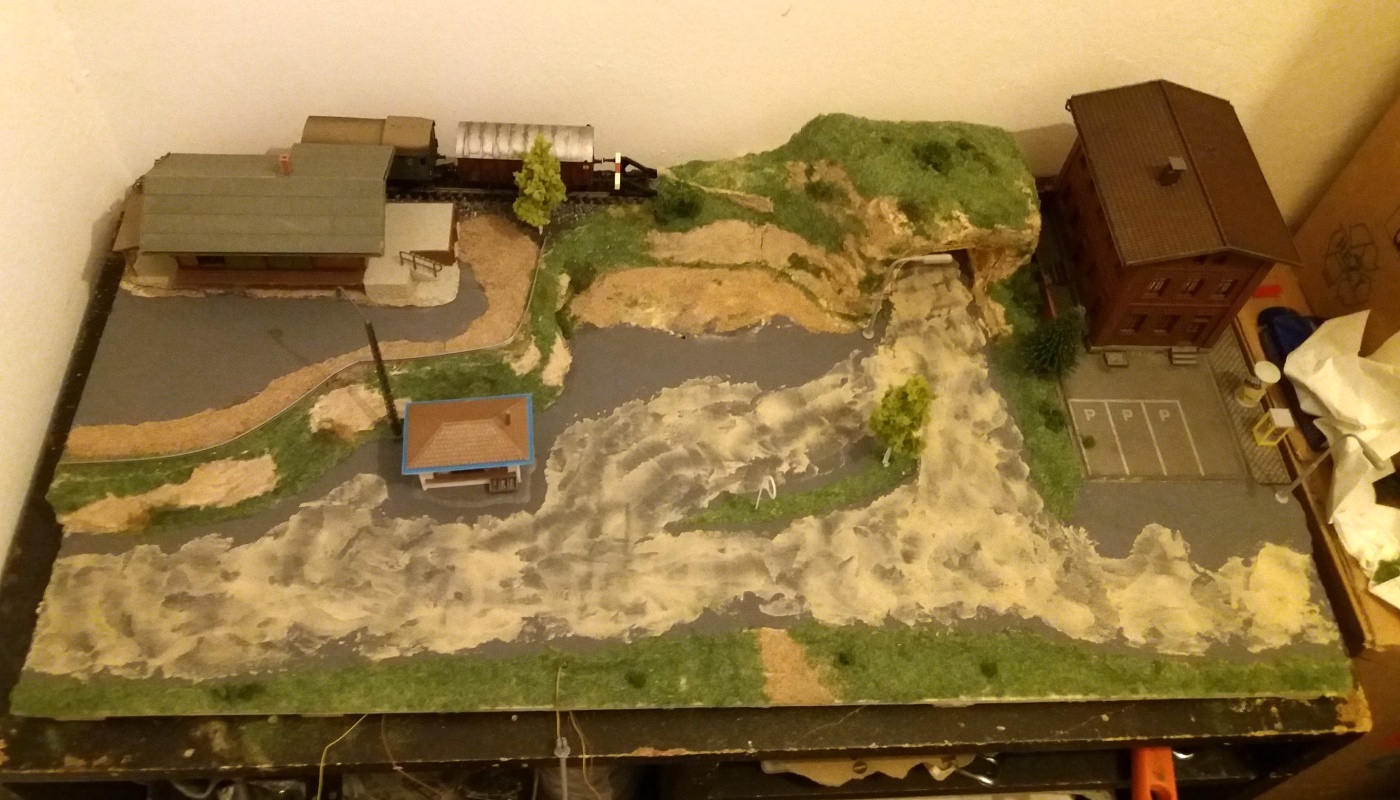
The landscape
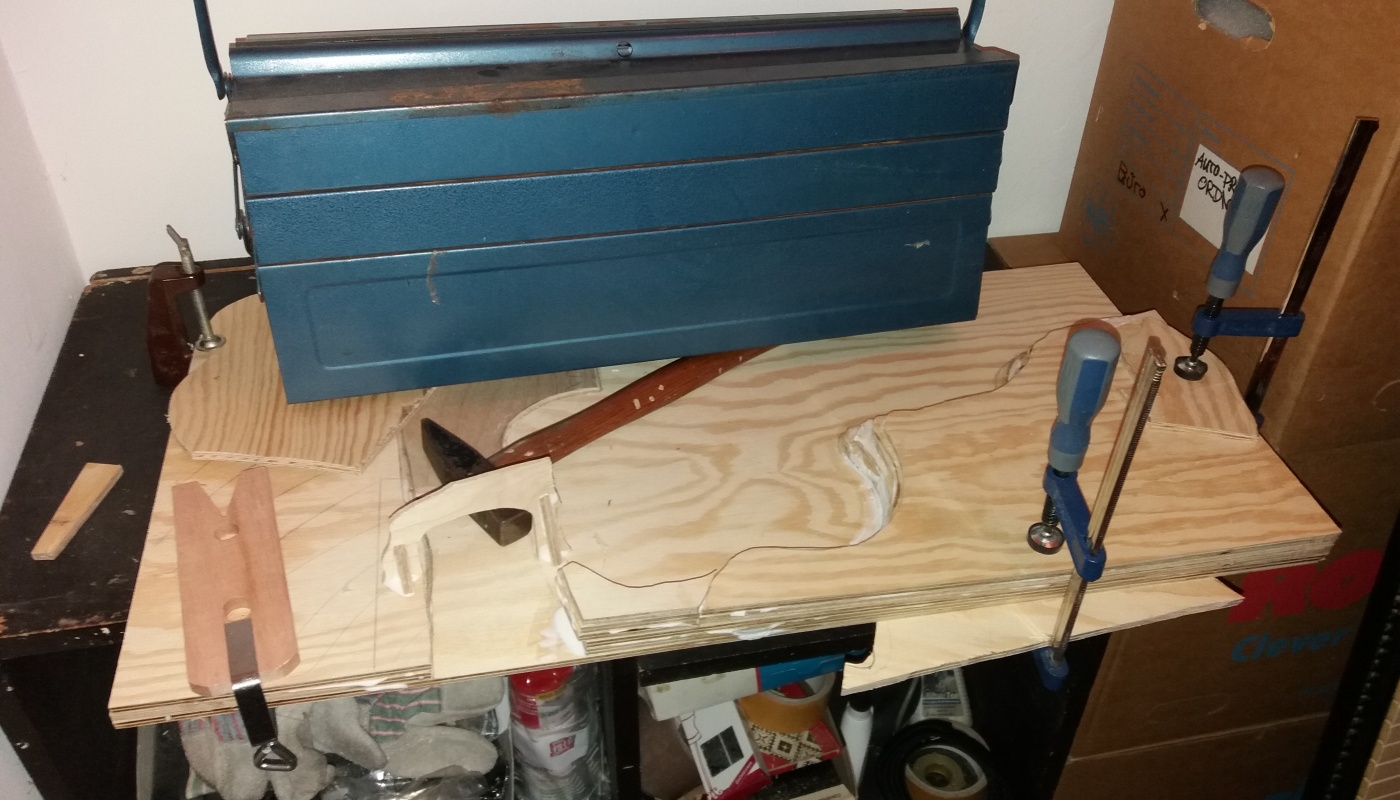
Of course, a landscape becomes much more exciting due to differences in altitude. In my diorama, these are classically based on various layers of plywood glued on each other. I refined the initially very gradual course of these layers with a lot of “Hydrozell” filler from Faller. – Of course you can also just use any regular filler, but in terms of workability, malleability and drying time, “Hydrozell” is simply excellent. Where there are too large holes, you simply glue in a few scrap pieces of plywood in advance. “Hydrozell” does not cause any problems when coloring, gluing or sprinkling. – Spatulas in several sizes for the rough structure and plastic knives and micro spatulas for the fine structure and a rubber bowl for the putty are suitable for working. Otherwise: courage for chaos, because nature is also chaotic!


The powerful “law of chaos” also applies to the use of litter, grass, bushes: it grows where it falls, and a lot mixes with one another. I represented rocks by coloring the dried hydrocell filler with watercolors and opaque white – not easy to find the right color shade here, which in nature can be somewhere between slate gray and sandstone beige …
The streets should also look realistic. I used to make them out of gray construction paper and embedded the edges in scattered material. But there were visible joints … Here I decided to “paint”. After initial attempts with water color, I found that it was too uneven and not opaque enough. Here, too, I opted for a Faller product (don’t worry: I’m not under a contract with Faller). The street color (180506) matches the street color very nicely, which lightenes to a very even dark gray as it dries and it does not smell “unpleasantly toxic”.
After the first “street painting”, however, the streets were much too even for me – where were there really even streets as early as 1960? So the streets were covered with a nice bumpy layer of filler and repainted. Now there are a few “bumps” and cracks in the road surface here and there, that’s good! – In the case of the slightly lowering or rising street sections, I pre-sanded the plywood pieces in question with a file and then with sandpaper, then worked out the details with filler.
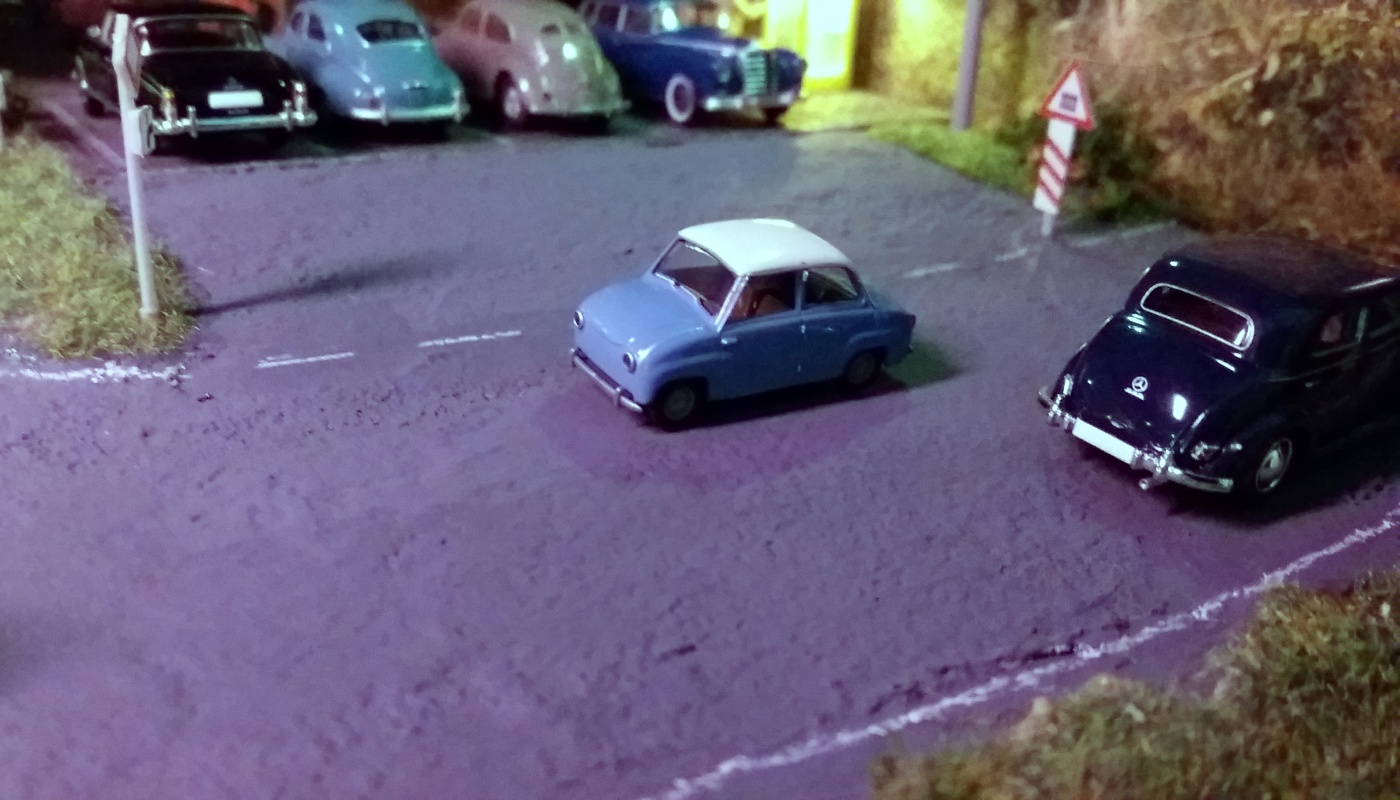
In the old days, the road markings were not as wide and durable as they are now. Nevertheless, I did not want to do without it for marking the edge of the road, bus lanes, kinking right of way, etc. I can highly recommend the tool used: The road marking starter set from NOCH (60740). It contains, among other things a white marker pen with which you have the application thickness well “in your hand”, and a curve ruler that you can always use for something else.
The decoration
Nothing is more important for a realistic effect in model making than rich decoration. A list of my measures:
- The Faller “City Decoration” package (180585). It contains beautiful old telephone booths, benches, flower boxes, letter boxes, billboards, advertising pillars, wastebaskets, cigarette machines, bus stops and more – all the little things that shape a street scene.
- Numerous labels, company logos and poster motifs from the web – with the above mentioned “Quark XPress” scaled accurately to a tenth of a millimeter and then printed out on self-adhesive label paper
- Guard rails, boundary posts and traffic signs from the appropriate Faller sets
- Trees such as birches and firs, for bushes and shrubs “iceand litchen” in different colors, flower flakes made of colored foam
- Of course, various Faller litter such as flower meadow, grass, dirt road sand, gravel, etc.
- Lots of cargo, stacks of pallets (also nicely “dirty”) and pallet trucks for the freight depot
- Brick paper for the tunnel entrance
- Human figurines of all kinds such as passers-by, petrol station employees, loading staff, etc.
The background
A good background, which continues the actual landscape into the expanse, is essential for a realistic effect. There are suitable landscape motifs for this on numerous websites. Such an image file should have the highest possible resolution so that nothing appears “pixelated” afterwards. A high four- or even five-digit number of pixels is highly recommended.
I found a background ideal for my purpose on a Wikipedia page: https://de.wikipedia.org/wiki/Datei:Bad_Hindelang_panorama_view_from_south.jpg *.
* The address is not linked here. Since it has a .jpg extension like an image file, there would otherwise be conflicts with the “image slideshow” functionality on this website. If necessary, please copy the address and enter it in the address field of the browser.
The multiple award-winning picture is from Jürgen Matern. The license rights can also be viewed on the Wikipedia page mentioned above. Here is the picture in a greatly reduced version, the largest available resolution is actually 10,000 pixels:
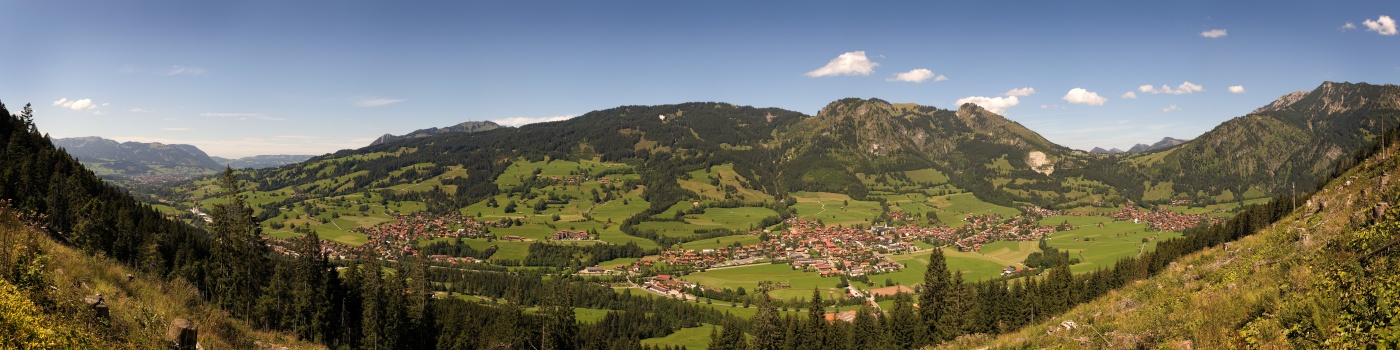
I made a rough image montage from the front view of my diorama plate and the background image motif and then printed out the selected image section. A helpful tool called Easy Poster Printer is well suitable for this. I glued the pieces together and attached this strip to the back wall and the side walls of the cabinet floor. – Alternatively, you can of course also use a poster printing provider on the web.
The light
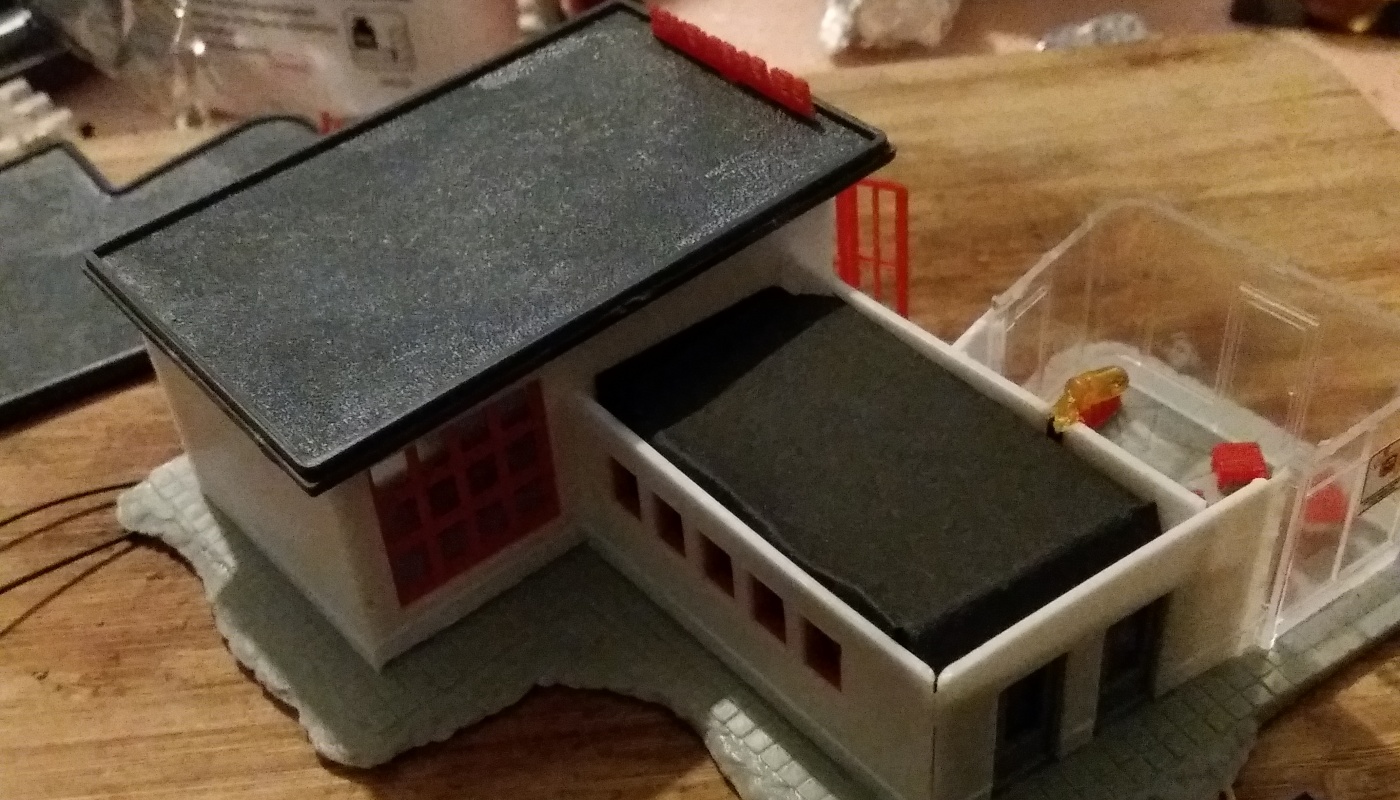
I already loved the possibility of showing evening or night on my old Märklin layout. – I also provided all buildings with lighting for the “Diorama”. In all building kits there was a “light mask” made of black construction paper to suppress shining light through the walls – except for the gas station. So I made a light mask for the rear part of the building myself and also installed a (heat-free) LED lighting under the roof in the front part. – The illuminated telephone booth comes from BRAWA, nice that this is possible nowadays thanks to heat-free LEDs.
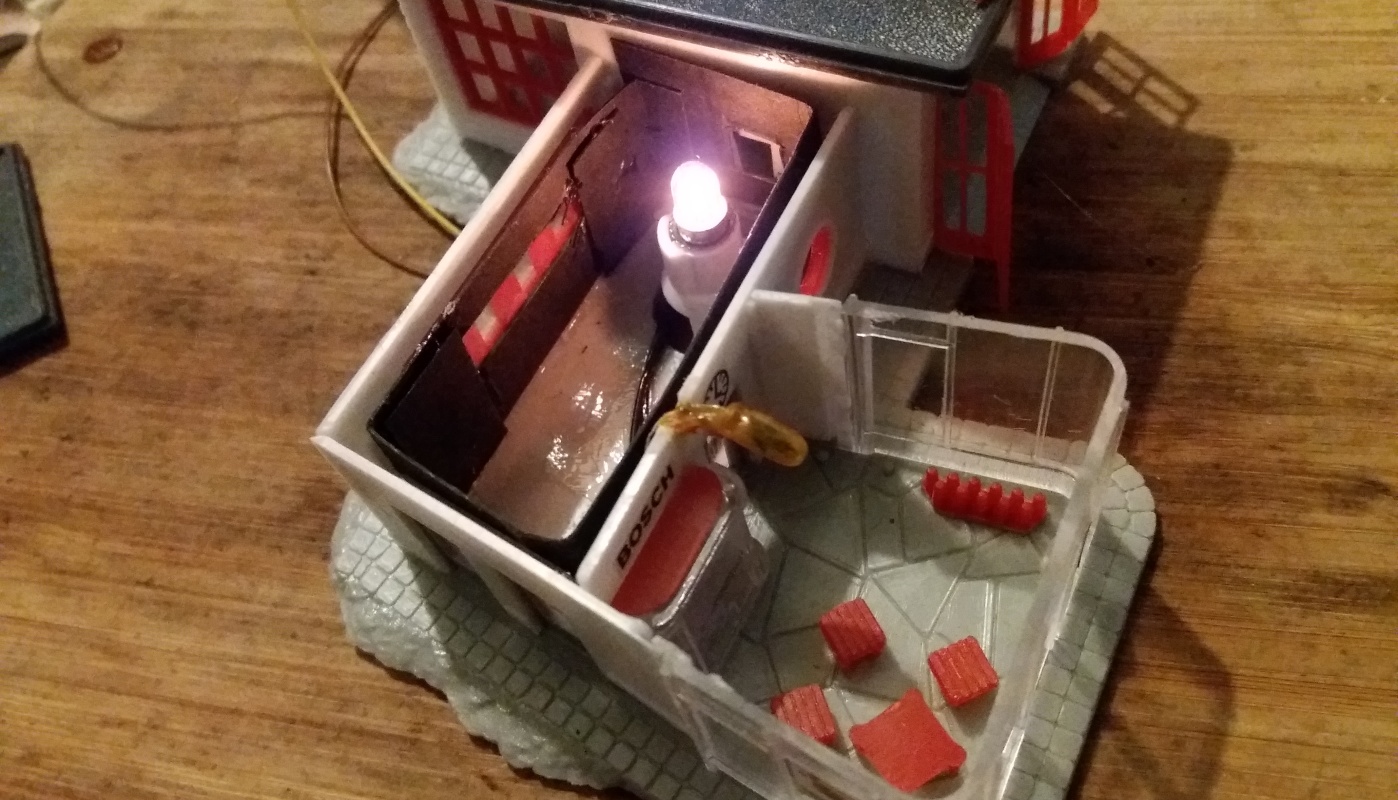
In addition to the house lighting, I installed a wonderfully “real” lattice mast lamp from Viessmann at the freight depot, as well as a few whip lamps from the same manufacturer on one side as street lighting. However, the whip lamps were much too bright for me at the 16 volt voltage initially targeted, so I decided on 12 volts and reduced the number of street lights to three. The power supply is provided by a small universal power supply unit and can be switched on and off using a switch under the system.
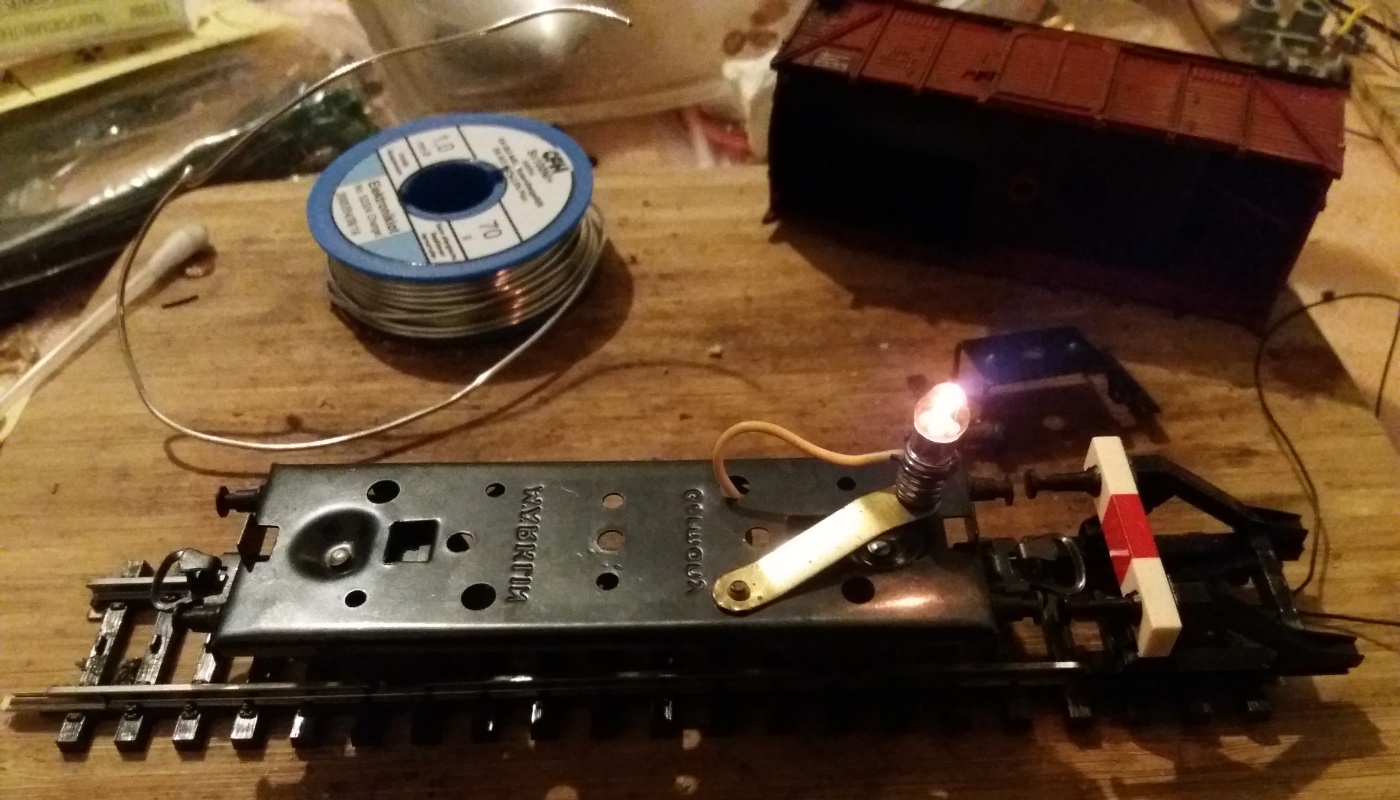
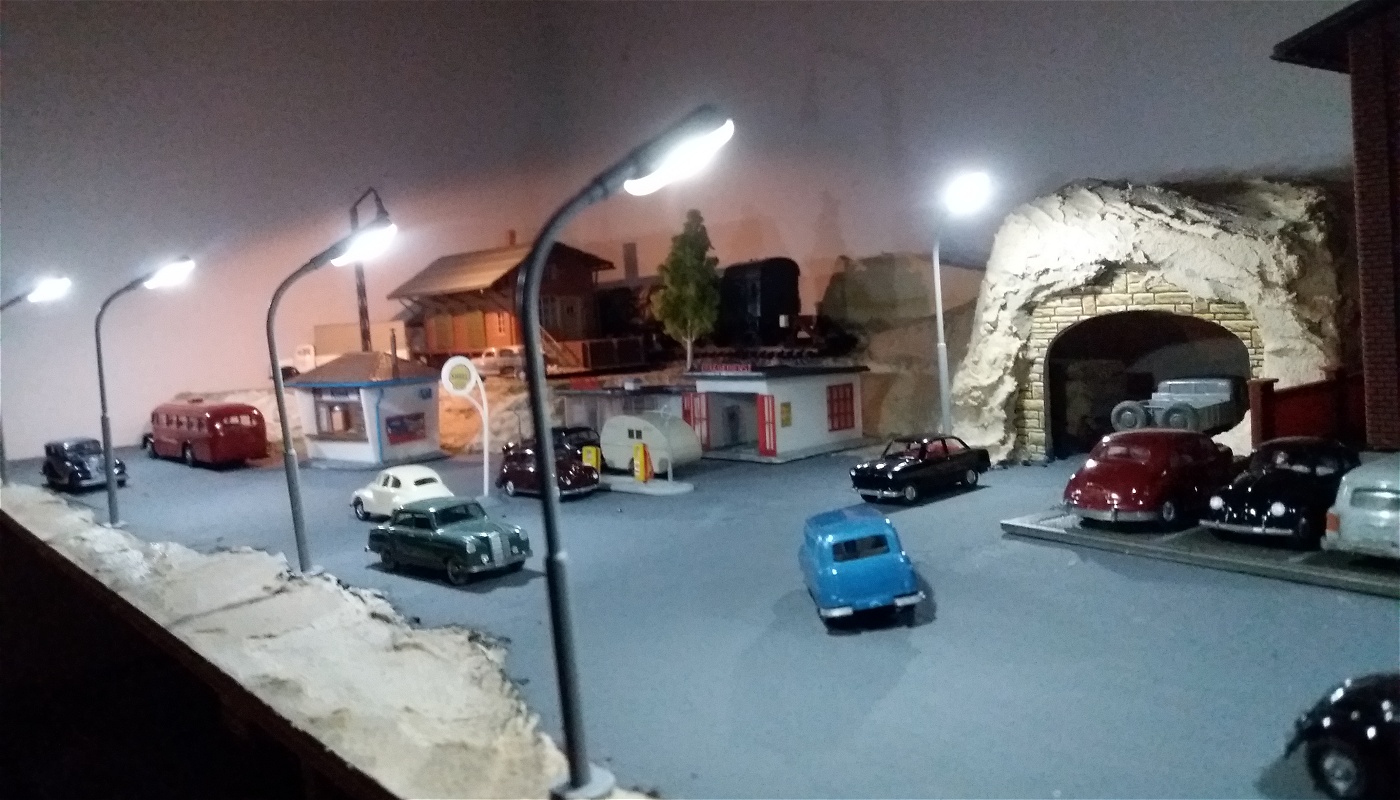
There is no lighting on the vehicles, but at least one of the freight waggons should have a “final lantern” glowing. I first had to repair it in the freight waggon in question, and also solder a power supply to the track section.
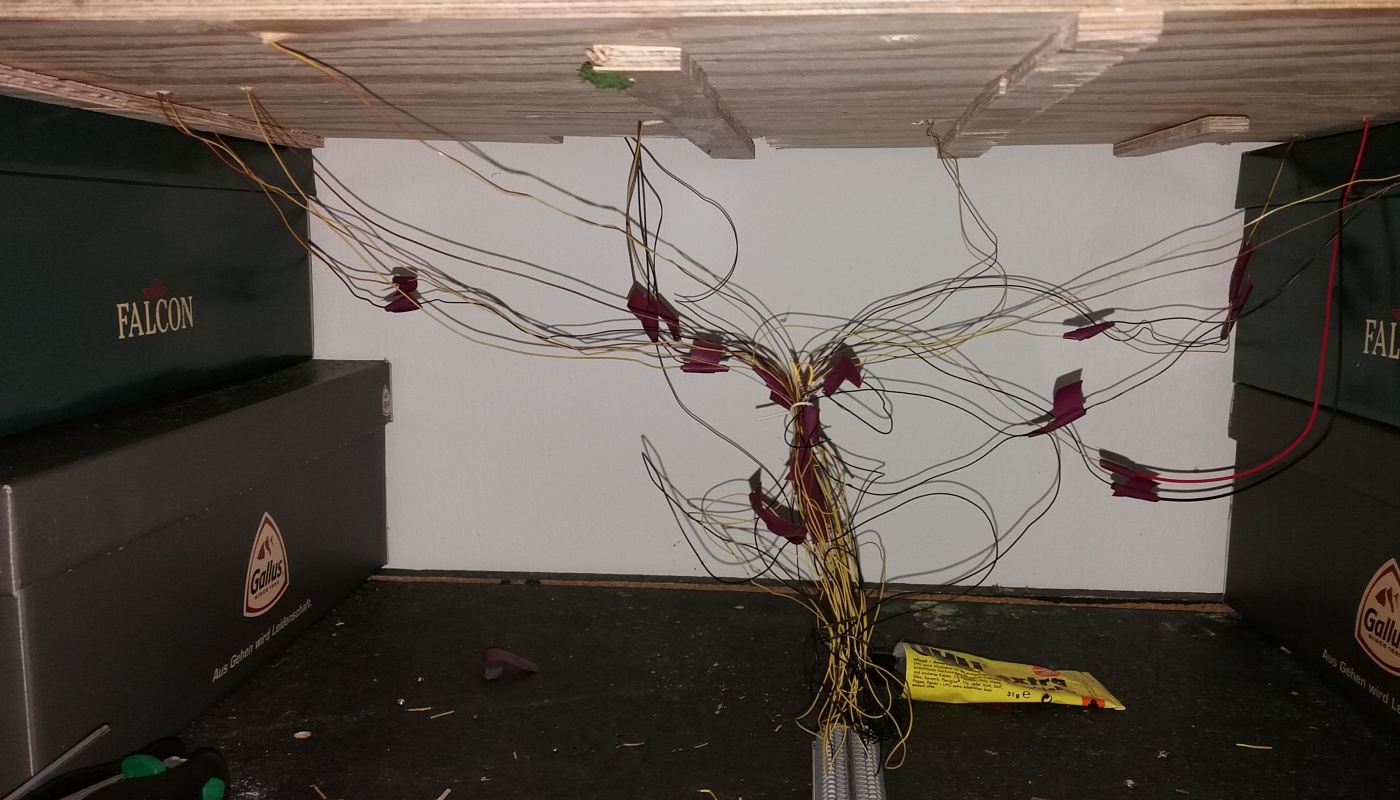
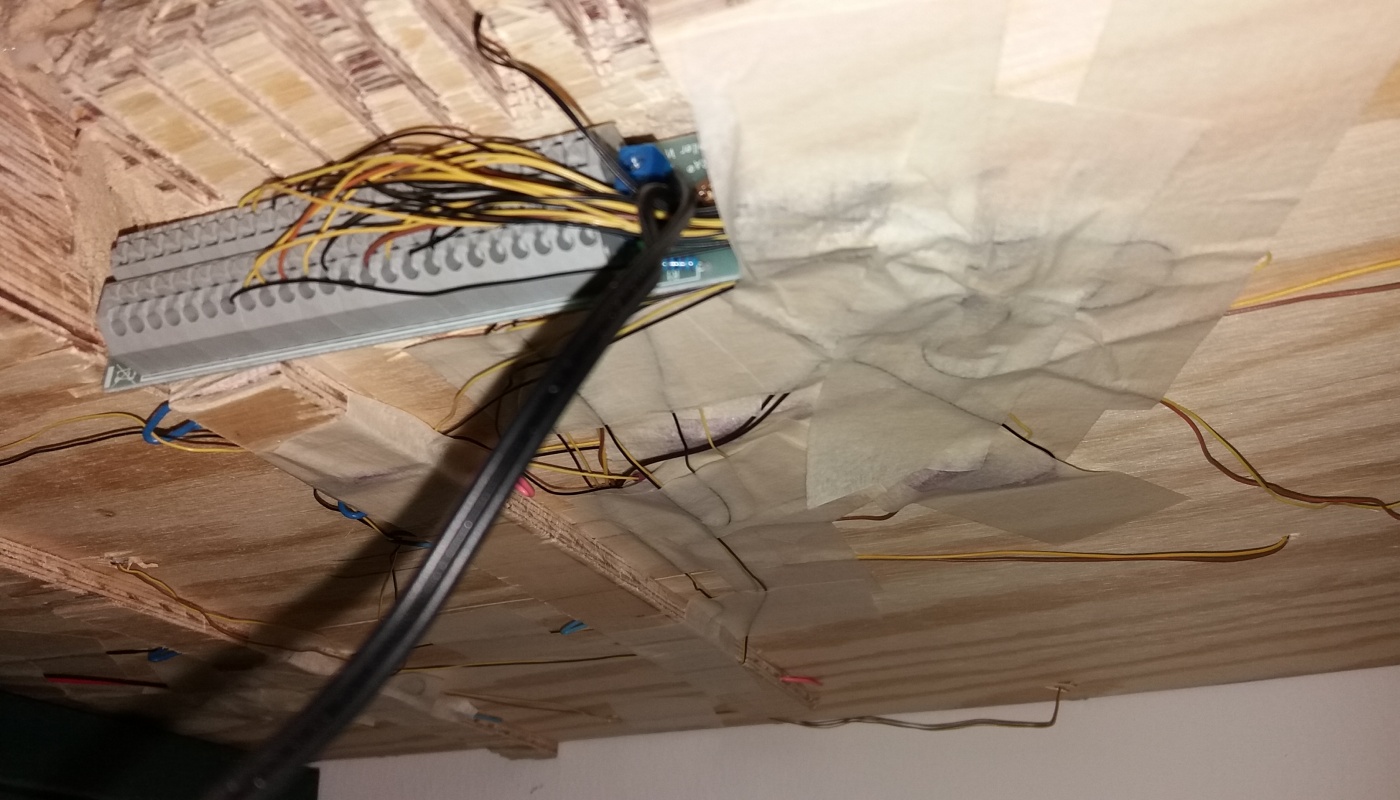
Almost like in old times I finally had a “lively tangle” of cables under the plate. In order to fix all of this and finally lead it to a central location, I lengthened or shortened some of the wires if necessary and brought them together towards a power distributor, which is screwed invisibly in the area to the left of the tunnel entrance. This power distributor from Tivendis is beautifully compact and has 2 x 24 connections that are equipped with very solid spring-loaded terminals. It is centrally supplied with power from the power supply unit. – I then fixed the lighting cables, which were still relatively loosely dangling, to the bottom of the plywood base plate with textile adhesive tape. This makes it easier to take the diorama out of the cabinet if necessary.
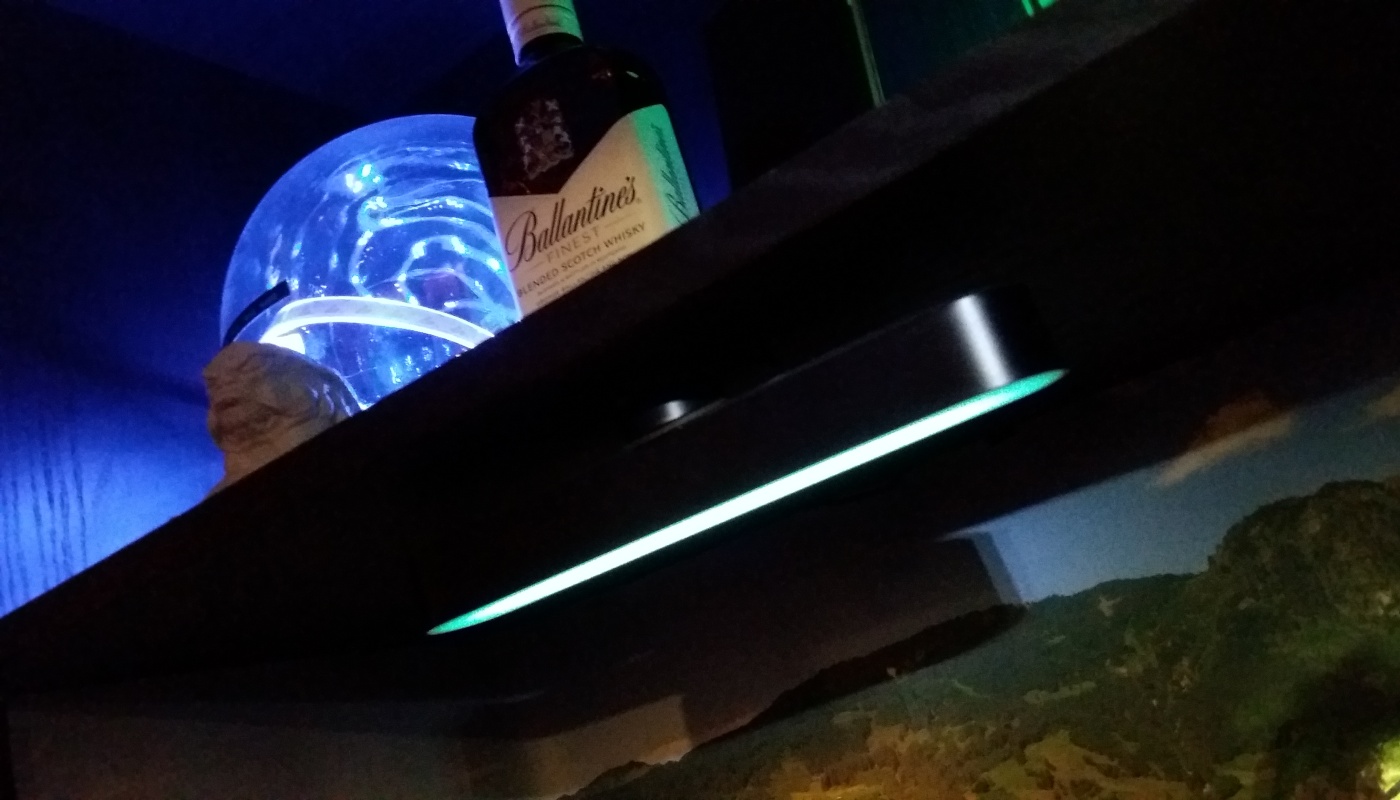
I got the idea of installing a Philips Hue lamp above the diorama not before the system had already been placed in the cupboard: Since the cupboard is in a niche in the hallway, only little indirect light fell on it: everything was pretty dark .. too bad! – So I decided to screw a Philips Hue “Lightbar” firmly over the diorama, which was easy to do with the help of the variable bracket supplied. – This now makes it possible to conveniently select any light color in any brightness level via the smartphone and thus create beautiful moods.
The rail vehicles
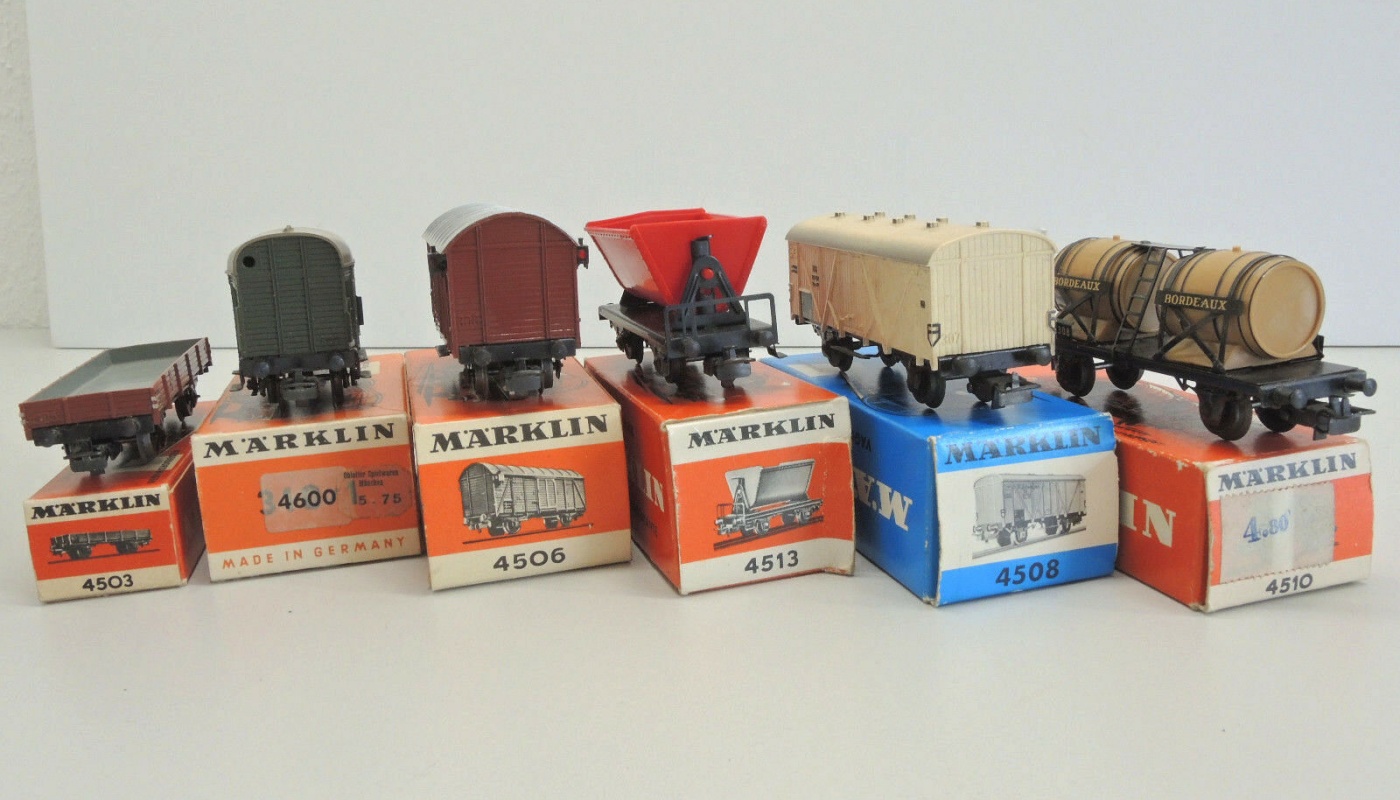
Of course, there should be a couple of nice freight cars on the sidetrack at the freight depot. In that case I thought: “New is expensive …” and bought a nice “bundle” of freight wagons on Ebay, enough to be able to exchange them from time to time. For a realistic look, the cars were of course first “smeared” with black watercolor. – Of course, a couple of tracks had to be found, including a buffer stop. I decided on an offer of MÄRKLIN K tracks that can be processed even more realistically than the good old metal tracks, which of course give more of the real old MÄRKLIN feeling on a large layout.
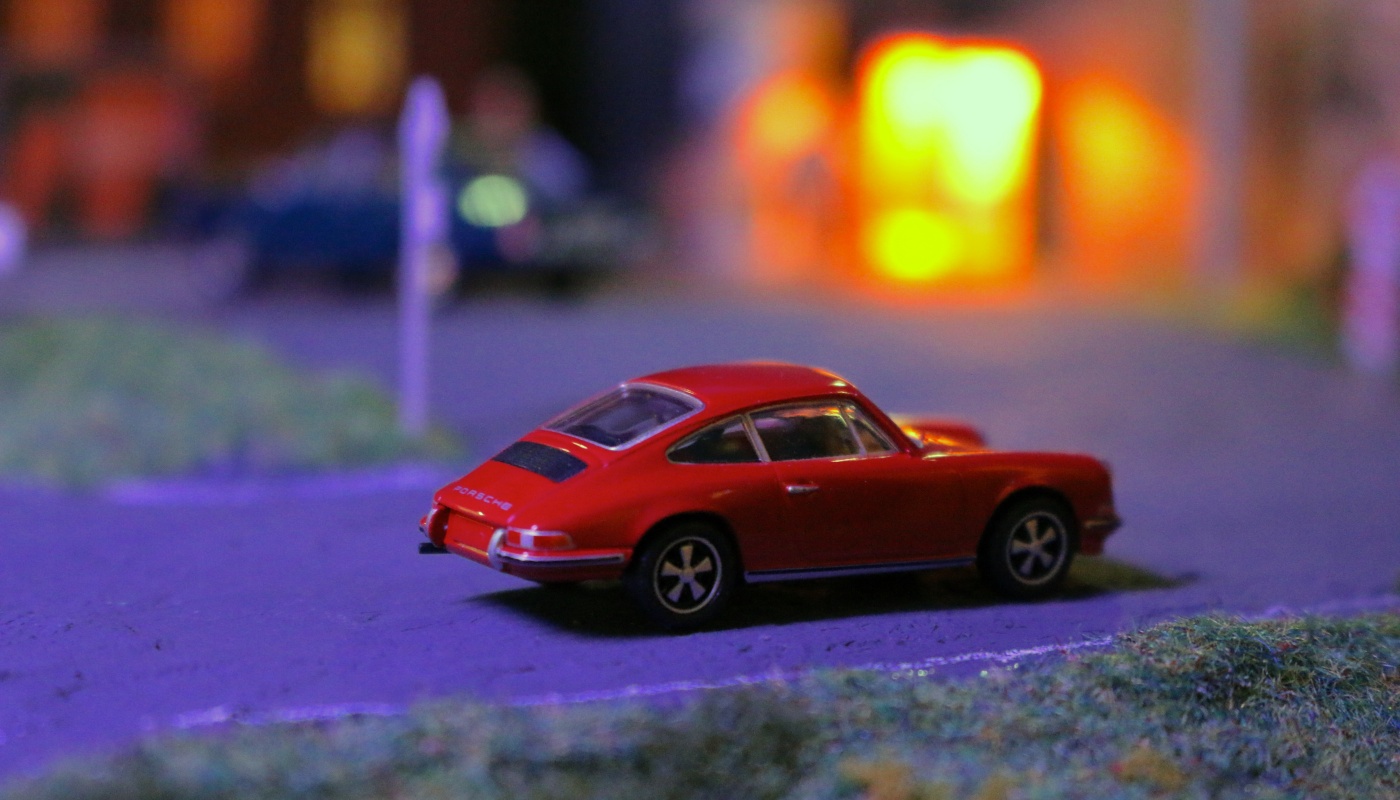
The road vehicles
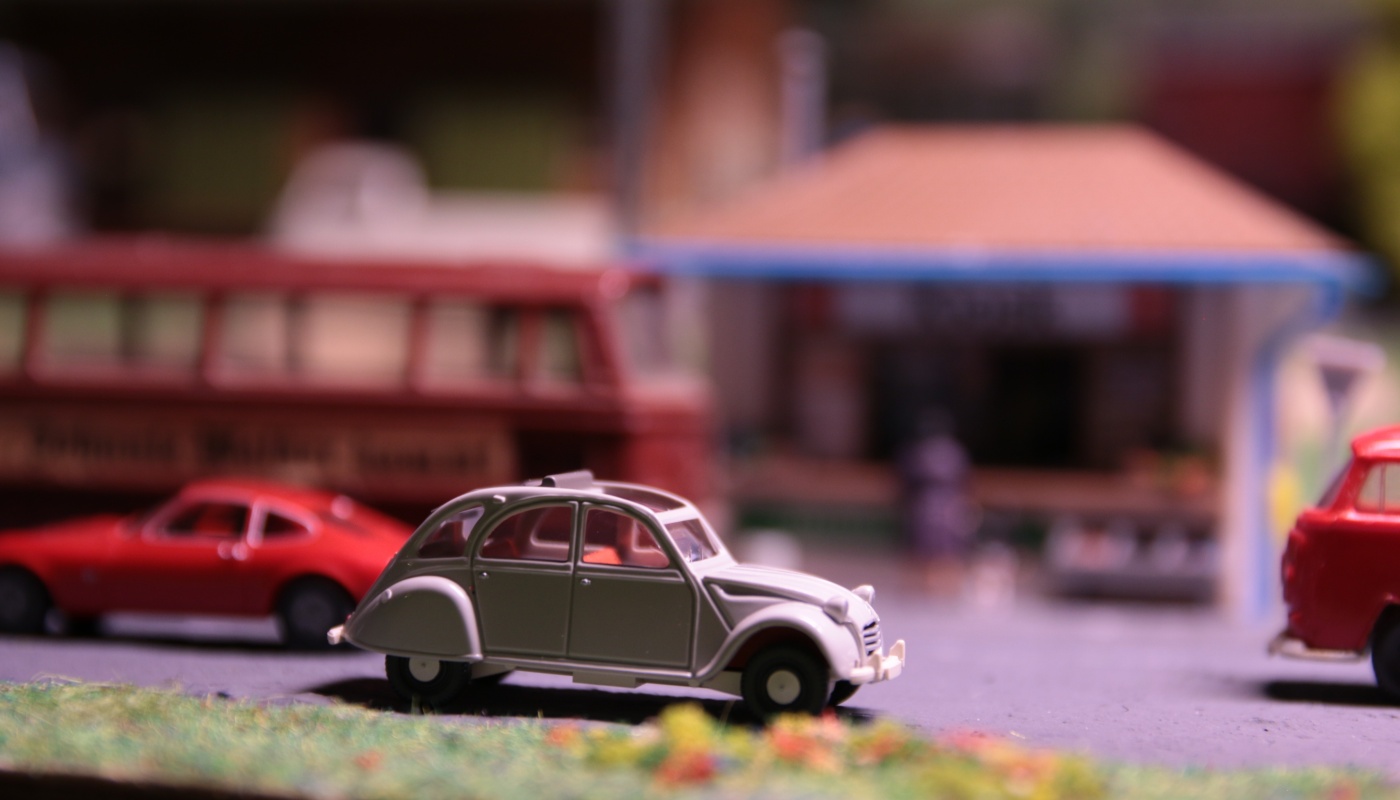
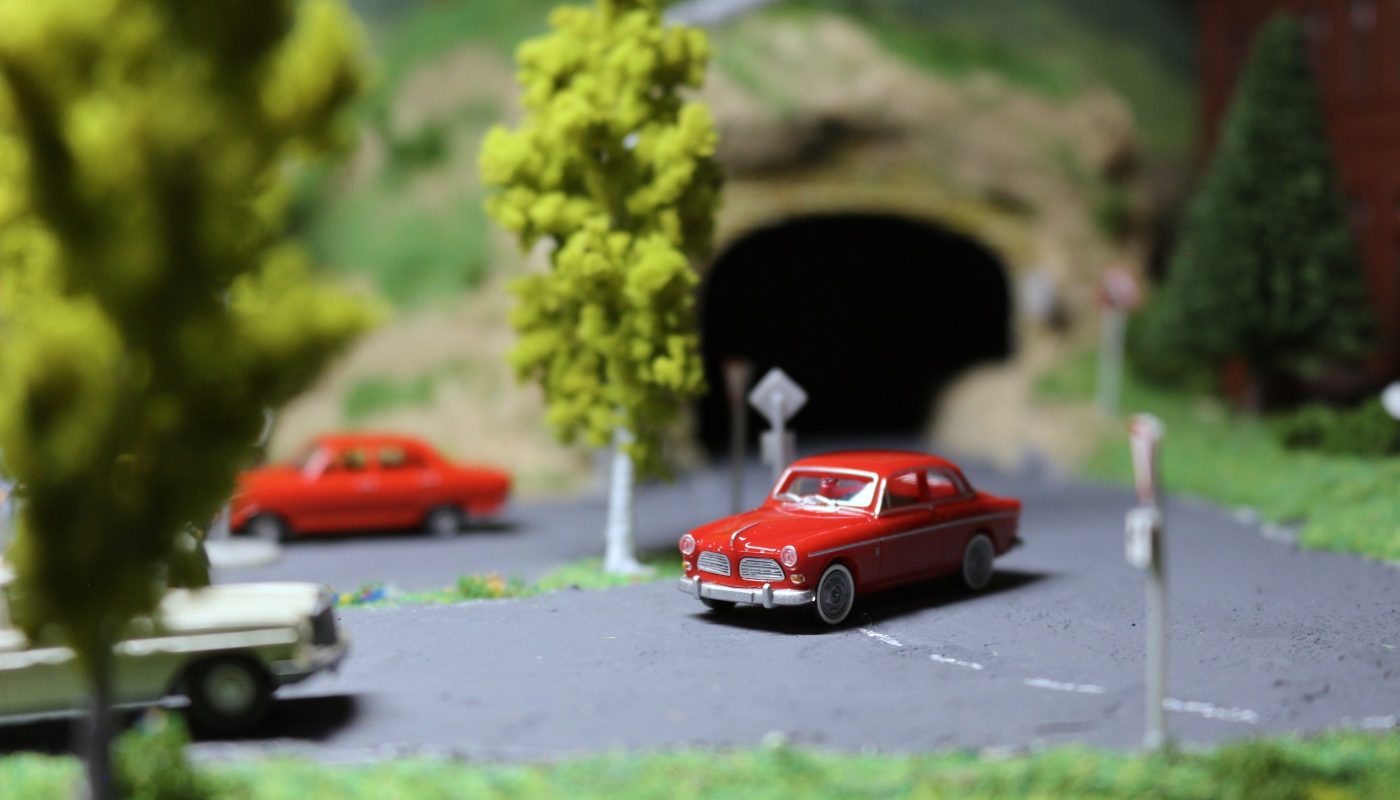
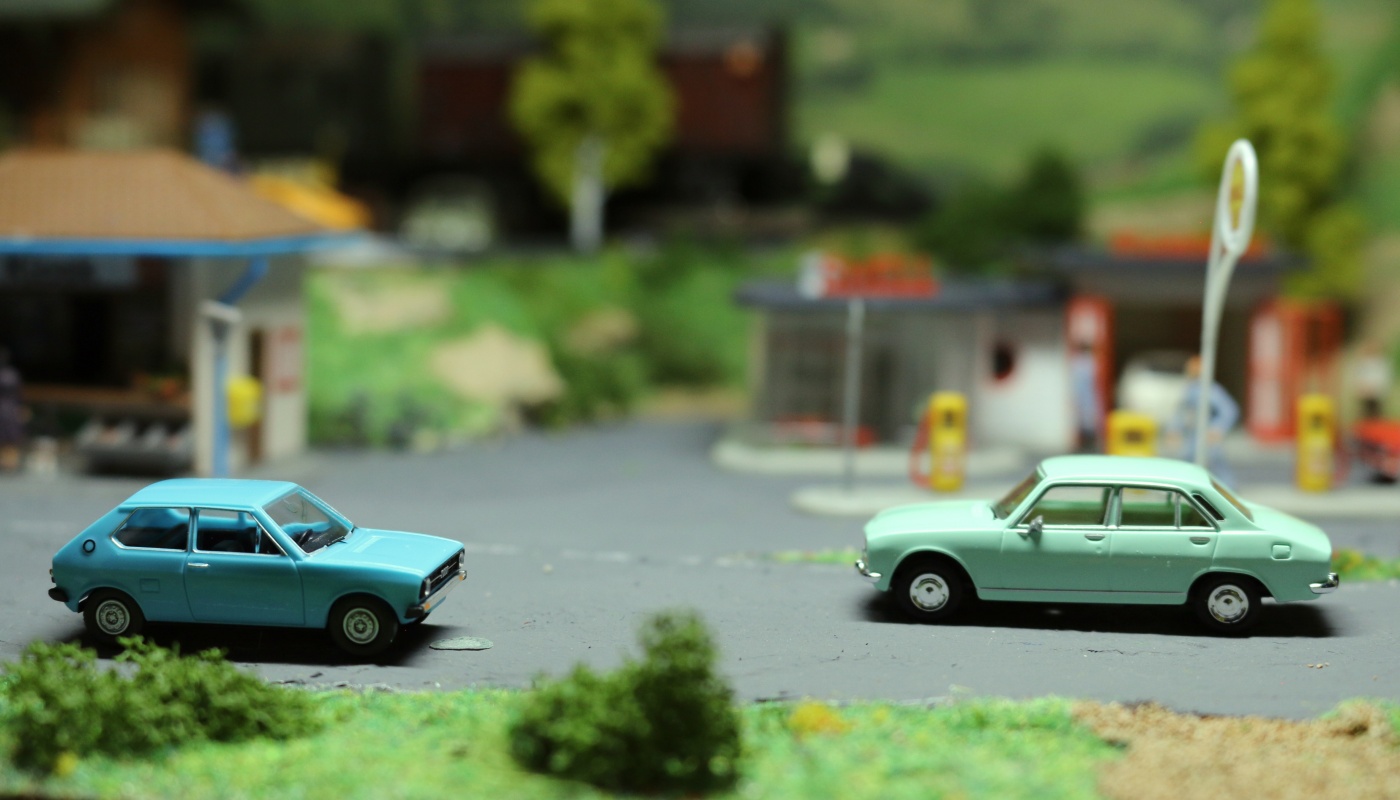
Some of the cars actually still come from my old H0 system, but over the years I have acquired many, lovingly made models from Wiking, Brekina, Praliné, herpa, Schuco, etc., preferably from the 50s to 70s. For the diorama, I also bought a nice “Wiking bundle” at a reasonable price on Ebay.
The security
All objects, including the houses, are glued to the ground, including the human figures, some of which otherwise would not remain stable. What is not glued are on the one hand the vehicles (just to be able to relocate or exchange them) and on the other hand the building roofs (to be able to change a bulb if necessary).
The base plate rests on some 6 mm thick plywood slats that are evenly distributed over the surface and glued to give the wiring underneath the system a little free space and to prevent cable breakage, etc.
The variety
Apart from very different lighting moods, variety can be brought into play at any time by replacing and relocating the freight waggons and car models.

I’ve already thought of possible extensions, first and foremost nice advertising lights that fit in with the time and are just not too glaring. A few other well-made miniature people or animals could also populate the diorama! – Let’s see what comes …